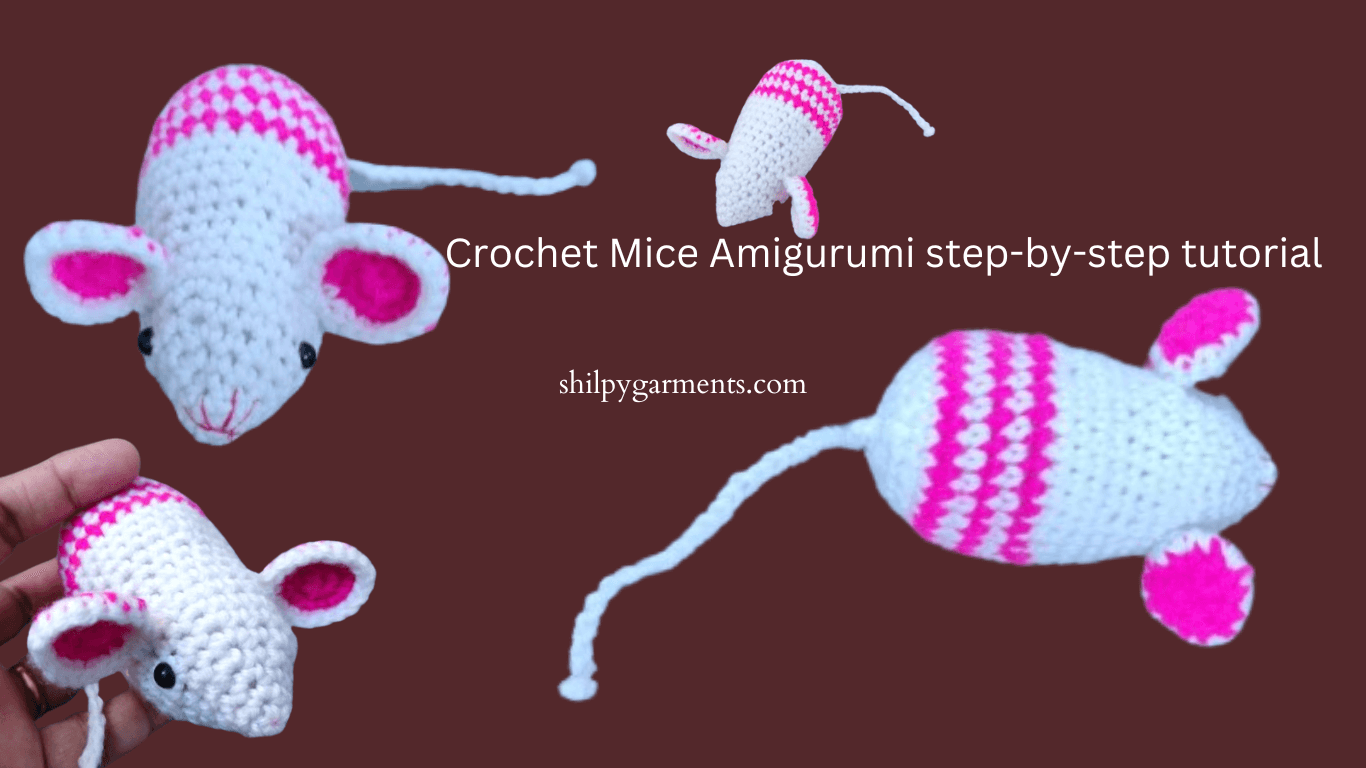
Crochet Mice Amigurumi, crochet mice amigurumi patterns,crochet mice amigurumi free,crochet mice amigurumi instructions ,crochet mice amigurumi tutorial,crochet mice amigurumi, youtubecrochet mice amigurumi, videocrochet mice amigurumi ,stitchcrochet mice amigurumi hat ,crochet mice pattern,crochet mice,crochet mice pattern free,tiny crochet mice,
Crochet Mice Amigurumi step-by-step guide
आजकल Amigurumi बहुत ही लोकप्रिय हो रहा है , जिसमें क्रोशिए से छोटे और प्यारे खिलौने बनाए जाते हैं । इस तकनीक का प्रयोग करके आप जानवरों, पक्षियों आदि को बना सकते हैं ।आज की इस आर्टिकल में आपको Crochet Mice Amigurumi बनाना सिखाऊंगी। इस प्रोजेक्ट में बेसिक स्टिच( basic stitch)का प्रयोग हुआ है , इसलिए जो crochet beginners हैं और जिन्हें कुछ प्यारा बनाने का मन हो रहा है, उनके लिए भी ये बनाना काफी आसान है ।

Material required for Crochet Mice Amigurumi:
- 4 Ply Vardhmaan Brilion Yarn in 2 Colours (Cream & Blue)
- crochet Hook : 3 mm
- Synthetic Cotton for Stuffing
- Safety eyes.
- Scissors.
- Needle.
- Stitch marker

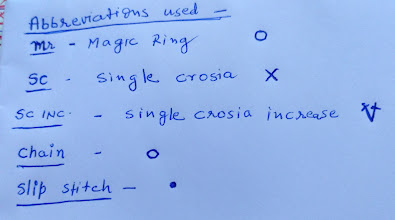
Abbreviations used in this project :
S: Stitch
mr : Magic Ring
ch: Chain
sc: single crochet
Rnd: Round
sl st: Slip Stitch
sc inc : single crochet increase ( 2 single crochets in one stitch )
वीडियो के part 1 में Mice amigurumi के 10 rows तक बनाना बताई हूँ। इसे फेस की तरफ से शुरू करके बनाते हैं। बगल में दिए गए वीडियो की देख कर आप आसानी से इसे बना सकते हैं।
Pattern Method for Crochet Mice Amigurumi :
Face & Body
With Cream(A) & Blue Yarn(B)
01. start 4 sc. into a magic ring [4](Using yarn A)
02. *sc, inc.* 2 times ,[6] ( A)
03.*sc, inc.* 3 times [9] ( A)
04. *sc 2, inc*3 times, sc [12]( A)
05. *sc 3, inc.* 3 times [15]( A)
06. *sc4, inc.* 3 times [18]( A)
safety eyes को राउंड 6 और 7 के बीच स्थित करेंगे।दोनों safety eyes के बीच में 6 single crosia की दूरी होगी।कानों को फिक्स करते समय नीचे की ओर से हल्का सा मोड़ लेंगे। (The safety eyes should be positioned between rounds 6 and 7, with 6 single crochets separating the two safety eyes.While fixing the ears, we will bend them slightly from below.)कानों को फिक्स करते समय नीचे की ओर से हल्का सा मोड़ लेंगे।
07. *sc 5, inc.* 3 times [21]( A)
08. same as 7th row . [21]( A)
09. same as 7th row . [21]( A)
10. same as 7th row . [21]( A)
Row 1 से 10
माइस के दोनों कानों को राउंड 10 के बाद लगाएंगे।11th राउंड बनाते समय ही कानों को भी लगाएंगे करेंगे। दोनों eyes के बीच के 4 बॉक्स को छोड़कर दोनों तरफ 3-3 बॉक्स में कान को फिक्स करेंगे।Both the ears of the mice will be attached after round 10. The ears will also be attached while making the 11th round. We will fix the ears in 3-3 boxes on both sides except the 4 boxes between the two eyes.
11. *sc.2, inc.* 7 times.[28]( A)
12. sc. in each st around [28]( A)
13. Same as 12th Row .( A)
14. Same as 12th Row .
15. Same as 12th Row .
17. Same as 12th Row .
18. Same as 12th Row .
19. *2 sc , sc 2tog.* 7 times, ,[21]
20. *1 sc , sc 2tog.* 7 times, ,[14]
21. * sc 2tog.* 7 times, ,[7]
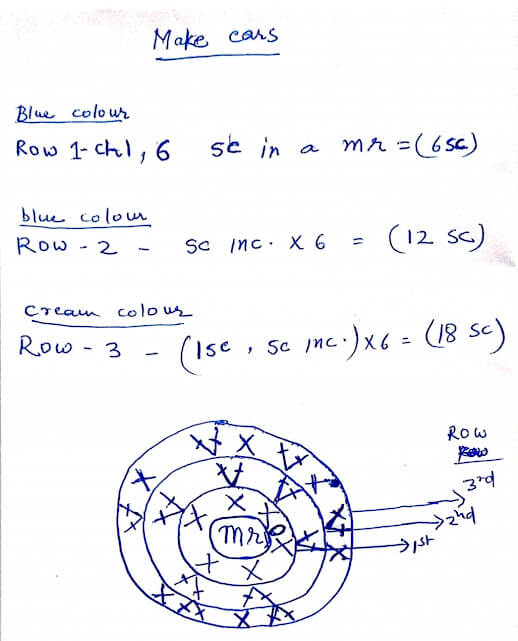
Make 2 Ears
With Cream & Blue Yarn
01. start 6 sc. into a magic ring [6]
02. *sc inc.* 6 times [12]
03.*1 sc, sc inc.* 6 times [18]

Tail
With White Yarn
Chain 25 , fasten off (कॉटन भरने के बाद जब निचले हिस्से को बंद करेंगे तब अंत के 1 फंदे में 25 चेन बुनेंगे और फंदे को बंद कर देंगे। )
Assembly:
Mice की हर पार्ट्स को अलग अलग बना लेने के बाद उसे आपस में सही जगहों पर जोड़ेंगे। इस toy में फेस से शुरू करते हुए इसकी बॉडी भी एक साथ ही बनी है। 10th row के बाद 11th row बुनते वक्त ही कानो को क्रोशिये से ही जोड़ेंगे। इसे कैसे जोड़ना है ऊपर लिखे गए इंस्ट्रक्शन और video को देख कर सिख सकते हैं। बॉडी complete होने के बाद stuffing से भर कर उसके शेप को बनाए रखेंगे।इस बात का जरूर ध्यान रखें कि stuffing को बराबर से हर तरफ बांटे ।
अब इसकी पूंछ (tail) जोड़ेंगे। इसे अलग से बना कर भी जोड़ सकते है या stuffing के बाद लास्ट में बचे एक फंदे को पूंछ की लंबाई के बराबर बुन कर भी इसे बना सकते हैं ।
Mice के फेस पर सेफ्टी eyes का इस्तेमाल करेंगे और नाक को सुई से बनाएंगे ।
सबसे अंत में mice को हल्के हाथों से दबा कर देख लें कही पर कोई दिक्कत तो नही ।
Care Instructions: Wash and preserve your amigurumi.
Amigurumi को बनाने के बाद उसे साफ और maintain करने का तरीका भी जरूर सीखें ।
Amigurumi को धोते समय हल्के गुनगुने पानी और mild detergent का ही इस्तेमाल करें । इसे धोते वक्त हाथ से बहुत अधिक दबाव न डालें ताकि इसका shape खराब न हो ।
किसी जालीदार वस्तु पर रखकर इसके सारे पानी को निकालकर धूप में ही सुखाएं । डायरेक्ट sunlight से बचाएं ताकि colour fade न हो । इसे वाशिंग मशीन से बचाएं ।
इसे Moisture से बचाएं और clean एवम dry जगहों पर ही रखें । रखते वक्त soft brush से हल्के हाथों से ब्रश करना चाहिए ताकि yarn का texture बना रहे ।
Amigurumi बनाने का आनंद :
इस तरह से इस amigurumi को सीख कर आप इसका आनंद ले सकते हैं और अपनी व्यक्तिगत कला को व्यक्त कर सकते हैं।इस आर्टिकल की मदद से आप crochet mice Amigurumi bana सकते हैं ।ये प्रोजेक्ट उन लोगों के लिए भी परफेक्ट है जिन्होंने क्रोशिए को सीखना ही शुरू किया है।शुरू में ही कुछ अच्छे प्रोजेक्ट बनाने के बाद रुचि और अधिक बढ़ जाती है ।
आशा करती हूं कि आपको मेरी ये आर्टिकल पसंद आई होगी और आप अपनी खुद की toys बनाएंगे। comment box में अपने विचारो को जरूर साझा करें ।
amigurumi mouse crochet pattern,how to crochet a mouse cat toy,mouse bookmark crochet pattern,amigurumi crochet tutorial cat,how to crochet a rat for beginners,how to make a crochet mouse,puppy amigurumi crochet tutorial,how to crochet mouth for amigurumi,amigurumi rabbit crochet tutorial,mouse in a suitcase crochet pattern,mini amigurumi crochet for beginners,amigurumi tutorial for beginners cat,amigurumi crochet keychain patterns,how to crochet a hamster for beginners,what to crochet with chunky yarn amigurumi,how to crochet a dog stuffed animal for beginners

